I made some wheelchair modifications

SueM in MN

combining the teacups with a roller coaster
Moderator
Joined
Aug 23, 1999
I had posted on another thread that I was planning to do some things to my daughter’s wheelchair, including some things to protect against scratches.
I added some protective tape to many of the painted surfaces of her chair. It’s called ‘helicopter tape’ and apparently was first developed to protect helicopter blades from being damaged by small debris. The same material is applied to car door edges and the back of car mirror mounts to prevent dings and damage from stones, etc.
Many mountain bike owners apply it to the frames, which how wheelchair owners got the idea.
The tape we used is made by 3M and is 2 inches wide. I got it on Amazon. I saw it on automotive websites for about 10 times the cost.
I viewed this YouTube video for hints on how to apply.
It is a kind of fiddly process to apply and does take some time. The tape is strong stretchy material (?vinyl) and needs to be stretched to make the flat tape fit the curved parts of the wheelchair frame. The tape is also very sticky; wetting the frame and tape keeps it from sticking so it can be repositioned until it’s right.
The most important thing is to apply to the center and smooth out from the center to the edges, stretching as you go.
You will have some tiny creases, but repositioning will help get rid of many of them.

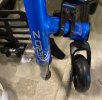
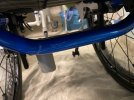
This is the first area I applied - underneath the chair, so it doesn’t really show. This was my practice area and I plan to redo it later.
14A5B6A3-00F6-440F-AFD9-27063FAB0E5C.jpeg

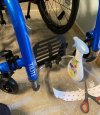
This shows my spray bottle with a drop of dish soap. A hairdryer or heat gun is also important to dry it and help the tape to soften and bend. I applied the tape to the top part of the frame and the bottom part is ready to be stretched and applied. Patience is really important.
5797E08D-18E4-4861-A830-2EE519CC152E.jpeg

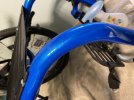
I also turned the chair upside down to get a better angle.
8448BFA2-AE78-46F7-9881-2E1E2353EDAA.jpeg
 
First side finished. If you’ve ever put a screen protector on a phone or tablet, the process is the same except the thing the tape is being put into is much bigger and curvy.
On both side, I went slightly underneath the seat sling upholstery so the top edge would not be exposed as much.
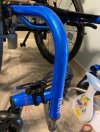
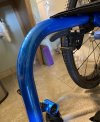
The outside is pretty good as far as creases and the tape can really only be seen if you are looking for it. The area with the arrow pointing to it also has tape.
D21A14CD-72A7-4820-94A0-4DB69EA9ED86.jpeg

The inside area of the frame is not as good - there are several creases, but overall, not bad for first tries.
631BF702-C40E-414A-B889-B817E94BA3B0.jpeg
The second side was easier and turned out better. The tape had been cut the same size as the frame; you can see from the picture how much it stretched.
B9EDB8A3-BF85-47EB-A5BB-FD920D927EEB.jpeg
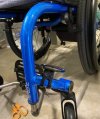
Finished second side. Gets better the more you do! There is a little haziness, which went away as the water underneath dried.

06498FCE-7DF9-4940-AD38-928B49C71C41.jpeg

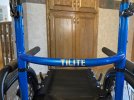
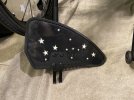
I also did the backrest bar and the side guards.
The side guards have glow in the dark stars for decoration and also so I can see which side is the outside when replacing them.
The tape I had was shiny - I don’t know if it comes matte. Other than the side guards, I only put it on shiny parts of the chair.
B1532419-158F-475B-8A12-AFA8CFD1C1B7.jpeg315BBCE3-9280-467F-9ED3-915B7E3E08A8.jpeg
 
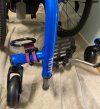
Cast members have sometimes had difficulty finding the tie down loops on the front of the chair because they are expecting them to be higher. I had marked them with tape or with bright ribbon on the loop, but my daughter obsesses about them. I added bright fuchsia vinyl tape to the mounting part of the loop. It’s very visible to anyone looking for the loop, but my daughter can’t see it when sitting in the chair.
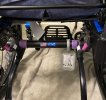
I added the same tape to the back loops.

43F9D86E-14AC-46C7-AB4E-F71CC3C00310.jpeg

When traveling by plane, I remove everything that is removable without using tools. I put a small dot of nail polish on the armrest and the armrest attachment so I can quickly see which armrest goes where.
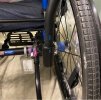
The purple kind of shiny thing next to the luggage tag and the blue ones on the wheel hub are reflective slap bracelets I found in Target’s Bullseye area of inexpensive items at the front of the store - small Easter basket gifts from a few years ago.
0B9D2255-72F3-481F-B355-8D8FEAA6A55C.jpegA07778B2-0A80-4C33-88F8-454765B8671E.jpeg
I bought these hooks on Amazon for her backpack. They have a ‘latch’ that must be unlatched to remove anything attached to them. I sewed a loop onto the backpack to go over the hook. It seems a bit more secure - someone wanting to grab her bag would need to know to unlatch it.
8D87A6B8-F1DA-407B-8C41-A81B57558603.jpeg
 
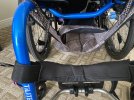
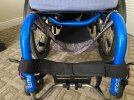
Bag for under her chair was made by me from water resistant nylon IKEA shopping bags.
It attaches to the chair on the back bar and front with Velcro. When off the chair, it folds up very small.
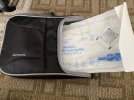
While in the parks, it holds her poncho and a bag full of catheters. To get thru park security, I can open it easily so Security can see nothing is inside.
3F665783-FF25-4604-8A81-0B0C07556611.jpeg

Closed with storage bag inside.
41F5165C-67D3-4236-897F-CEC1673597B6.jpeg

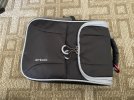
This is her storage bag - a lunch bag from Target. It holds 3-6 all in one catheter kits, which is enough for a park day.
We leave it out of the under seat bag until we’ve gone thru Security.
Once it’s back in the under seat bag, I can easily get a catheter kit out without removing the bag.
9884D36F-1BB9-495C-A607-25017C7809E6.jpeg
2B5C4C4C-1310-4781-807E-B2610BE0FBC9.jpeg
 
Bag for under her chair was made by me from water resistant nylon IKEA shopping bags.
It attaches to the chair on the back bar and front with Velcro. When off the chair, it folds up very small.
While in the parks, it holds her poncho and a bag full of catheters. To get thru park security, I can open it easily so Security can see nothing is inside.
Thanks so much for sharing all this info Sue. This is such great info!


Loving all of it!!! LOL I knew about "helicopter tape", but didn't know that folks were using it on wheelchairs, although it really is the perfect use case!

The Ikea bag hack is so excellent - the fact that it opens the way it does is brilliant! And the slap bracelets are so clever; one of those things I never would have thought of, but will definitely remember for future use!
 
That’s a good idea for protecting the pain. I would’ve never thought to use tape.
I would not have either. I saw it on a Facebook site for TiLite wheelchair users.
Several had done it and redone it, so I knew it could be removed without damaging the paint.
What an ingenious inventor you are! It looks sharp
Thank you. The old saying - necessity is the mother of invention.
Loving all of it!!! LOL I knew about "helicopter tape", but didn't know that folks were using it on wheelchairs, although it really is the perfect use case!

The Ikea bag hack is so excellent - the fact that it opens the way it does is brilliant! And the slap bracelets are so clever; one of those things I never would have thought of, but will definitely remember for future use!
Thanks.
The first bag we used under the chair was a big lunch bag that I sewed loops on and then attached with carabiners hooked to zip ties strategically placed on her chair.
That was too hard for bag checks since I couldn’t remove it easily and had to remove everything.
Bag 2.0 was kind of an underseat bin made from a section of a closet hanging bag covered with vinyl. It had a half height ‘door’ that allowed the catheter bag in a previous picture to be removed and Security could see the bin was empty. That worked well on her previous wheelchair, but this wheelchair has a lot less bars, so it Just didn’t fit.

This underseat bag is bag 3.0 and since I only had 1 IKEA bag, I didn’t have much to work with. I’ve got 2 new IKEA shopping bags waiting for me to make underseat bag 4.0
 
Wheelchair companies should seriously think about having some sort of paint protection on their chairs. Especially since some people consider getting a wheelchair akin to getting a car.
 
I like it. I’ve never heard of that tape and now I’m ordering some.

What I have used is Plasti-Dip automotive spray paint. The colors are great, even color changing and pearlescent colors. The stuff goes on thick and remains flexible. When it gets too banged up, you just peel it all off like a sunburn.
 
Wheelchair companies should seriously think about having some sort of paint protection on their chairs. Especially since some people consider getting a wheelchair akin to getting a car.
This TiLite wheelchair doesn’t actually need paint protection, I just figured it wouldn’t hurt, especially traveling by air and not knowing how much rough handling it would get.
The paint type is Metallic and is very thick and hard; looks pretty much like the paint on my Mazda, which has some kind of extra gloss coat. The chair is about 15 months old and the frame has no scratches or rubs. Some parts that are flat black paint do have some paint dings (anti tip bars and pushrims). Those are pretty easy to cover though.
The MSRP on her chair and all the pieces is close to my car, so yeah, we do consider it akin to a car.

Her previous manual wheelchairs have all been Quickie wheelchairs by Sunrise Medical. The paint on those is not as nice, but after 7 years of use, her last Quickie chair doesn’t have any scratches thru to the frame. It just has some very fine scratches that can only be seen close up.
 
The MSRP on her chair and all the pieces is close to my car, so yeah, we do consider it akin to a car.
Yeah, even when I do my ”mock builds” of different chairs, I treat it like I’m building a car. My parents are surprised when they ask me to build a car and they see how fast I go through it and how I explain the different options to them. It’s from the experience I have “building“ manuals and powerchairs for my future.
This TiLite wheelchair doesn’t actually need paint protection, I just figured it wouldn’t hurt, especially traveling by air and not knowing how much rough handling it would get.
The paint type is Metallic and is very thick and hard; looks pretty much like the paint on my Mazda, which has some kind of extra gloss coat. The chair is about 15 months old and the frame has no scratches or rubs. Some parts that are flat black paint do have some paint dings (anti tip bars and pushrims). Those are pretty easy to cover though.

Her previous manual wheelchairs have all been Quickie wheelchairs by Sunrise Medical. The paint on those is not as nice, but after 7 years of use, her last Quickie chair doesn’t have any scratches thru to the frame. It just has some very fine scratches that can only be seen close up.

Interesting…

I’m currently looking at manuals just in case I can’t get a big powerchair after I move and after many comparisons, pricing, etc. have deci that I would get a TiLite Aero X. The major selling point on that chair is that since I’m getting the HD package, they include the back upholstery at no charge.

It’s also a big relief to hear that the paint they use is a good high quality paint that doesn’t scratch easily, but you’re smart in discovering a good way to providing additional protection.

Now to decide between pink and purple for my chair…
 
Yeah, even when I do my ”mock builds” of different chairs, I treat it like I’m building a car. My parents are surprised when they ask me to build a car and they see how fast I go through it and how I explain the different options to them. It’s from the experience I have “building“ manuals and powerchairs for my future.


Interesting…

I’m currently looking at manuals just in case I can’t get a big powerchair after I move and after many comparisons, pricing, etc. have deci that I would get a TiLite Aero X. The major selling point on that chair is that since I’m getting the HD package, they include the back upholstery at no charge.

It’s also a big relief to hear that the paint they use is a good high quality paint that doesn’t scratch easily, but you’re smart in discovering a good way to providing additional protection.

Now to decide between pink and purple for my chair…
Because my daughter has a more specialized back, we ordered hers without back upholstery. We did order it with seat upholstery since her seat cushion rests on that.
 
...Now to decide between pink and purple for my chair…

I have purple, and I think there are a couple of other purples around here too, but I don't recall anyone else having the pink! (I think there's one of the turquoise)
 
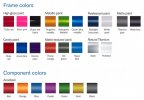
My daughter’s is Ocean Blue Metallic. I have seen some of the high gloss colors and and the Midnight Blue Pearlescent paint. I haven’t seen the matte paint or matte textured paints.
We chose metallic because they look ‘deeper’.
The component colors are extra cost ‘accent‘ colors for some of the small parts
E205A92F-75D7-4378-911E-8E47AA36AF5E.jpeg
 
Not a fan of matte paints. To me they just look “dull”. I was gonna have the Spinergy wheel spoke color dictate what color chair I end up getting. But alas, Spinergy has both pink AND purple spokes in the wheel I’m looking at (the LX)
 
My daughter’s tires are Spinergy Spox. We just got black spokes because we didn’t know how any of the others would look with blue frame.
 

GET A DISNEY VACATION QUOTE

Dreams Unlimited Travel is committed to providing you with the very best vacation planning experience possible. Our Vacation Planners are experts and will share their honest advice to help you have a magical vacation.

Let us help you with your next Disney Vacation!


facebook twitter
Top