lisa-upnorth
Disney Lover
- Joined
- Feb 20, 2009
UPDATED!
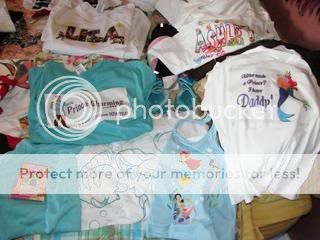
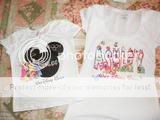
First off, I want you all to know I am NOT crafty! I am good with the computer and have been on the Dis for a bit.Just 2 weeks ago I found a thread discussing the personalized images and it sent me here-thank goodness!!!!I was stunned to see all I had been missing!Designers-you images are AMAZING! You have a great talent and are generous with it.We all THANK YOU!! I wanted to share a newbies adventure into making her family shirts.Here it goes-
1.Search through the designers shared folders to see all of their designs to date-and search for names you need.This is usually located in the first post under the designers name.
2.Find the images you want and save them to your computer-I made a folder for them under My Pictures.
3.Make sure your ink cartridges are at least 1/2 full-if not buy more!I made 8 shirts and started with a 1/2 full color and a new black and still have loads left on each!If you have just loaded new cartridges-print a test page of your first design to get the ink flowing.I had a few drops of ink and smudges on one I did right after inserting new cartridges.After the first one, they were all perfect though.
4.I went to Staples and bought Avery transfers-light and dark.They worked fine.
5.Went to Michaels craft store and bought Tshirts at 2/$5.Also had a few from JCPenney that were on sale.Got a 4T granimals top for the little one at Walmart for $3.I washed them and dried them with NO FABRIC SOFTENER!
6.Used our home printer-an HP deskjet.When you print an image on light transfers be sure to go into printer options and make it a mirror image!!Make sure when you use dark transfer this option is OFF!Dark transfers do not need to be flipped!Also run a test page to see what side of the paper your printer prints on-if you don't know for sure!Mark an X on a sheet of paper and see how it prints something you typed-on the X or on the blank side.Be sure to load your transfer with the correct side to be printed.
7.After printing,I let my transfers dry for 1 hour.
8.I used my iron with no water in it.I preheated it for 5 mins. on highest setting.I used my kitchen counter(stainless steel) with a large,white plastic cutting board covered in a pillow case as my base.I ironed the case.
9.Center the area of the shirt you will transfer to on the cutting board.Be sure it is straight!!I stood on a step stool to be the right height above it-you should too!Iron the shirt.
10.IMPORTANT-check shirt for lint!Remove all small threads,hairs,odd fibers!I thought I was thorough but had one small blue piece of lint stuck under a clear area!!
11.For light transfer-do not try and remove backing!(trust me,you can't!!! ) For dark transfer,peel off backing before ironing-then cover COMPLETE design with tissue paper that comes with transfers.
12.Place design on shirt where you want it-try to use bottom of letters for a straight line.(you can trim a design if there is a lot of blank transfer.Don't trim too close to the design.Be careful when you are handling the transfer not to rub to much on the printed design or to scratch it with the scissors or your nails.)
13.Run iron over entire design SLOWLY and not pushing too hard for the first pass.This will help it to stick to the shirt a bit so you can then give it some elbow grease.I used too much force at first and had a mangled straight edge on one when it shifted
14.Then,lean into it and iron entire design slowly and firmly.Take about 2-3 minutes to iron it.I leaned onto the iron but not insanely hard.Run very slowing all along outer edges a few times-this is where you need it to be sealed the most!.
15.Let shirt cool for 5 minutes somewhere off the ironed area-since it is warmer there,it will take longer.Shirts can be moved without any damage.
16.Peel off paper from design slowly.
17.BE AMAZED AT YOURSELF!!!
PICS OF ALL STEPS ARE NOW POSTED!!!THEY START ON PAGE 6 IN POST #77
Hope this helps my fellow newbies! I did not wash mine after printing-we just packed them and wore them.I cannot wait to show off my family in our great designs in 3 weeks!I will be posting our pics when we return.Special thanks to Kellybell and Tebi73!
First off, I want you all to know I am NOT crafty!
I am good with the computer and have been on the Dis for a bit.Just 2 weeks ago I found a thread discussing the personalized images and it sent me here-thank goodness!!!!I was stunned to see all I had been missing!Designers-you images are AMAZING! You have a great talent and are generous with it.We all THANK YOU!! I wanted to share a newbies adventure into making her family shirts.Here it goes-1.Search through the designers shared folders to see all of their designs to date-and search for names you need.This is usually located in the first post under the designers name.
2.Find the images you want and save them to your computer-I made a folder for them under My Pictures.
3.Make sure your ink cartridges are at least 1/2 full-if not buy more!I made 8 shirts and started with a 1/2 full color and a new black and still have loads left on each!If you have just loaded new cartridges-print a test page of your first design to get the ink flowing.I had a few drops of ink and smudges on one I did right after inserting new cartridges.After the first one, they were all perfect though.
4.I went to Staples and bought Avery transfers-light and dark.They worked fine.
5.Went to Michaels craft store and bought Tshirts at 2/$5.Also had a few from JCPenney that were on sale.Got a 4T granimals top for the little one at Walmart for $3.I washed them and dried them with NO FABRIC SOFTENER!
6.Used our home printer-an HP deskjet.When you print an image on light transfers be sure to go into printer options and make it a mirror image!!Make sure when you use dark transfer this option is OFF!Dark transfers do not need to be flipped!Also run a test page to see what side of the paper your printer prints on-if you don't know for sure!Mark an X on a sheet of paper and see how it prints something you typed-on the X or on the blank side.Be sure to load your transfer with the correct side to be printed.
7.After printing,I let my transfers dry for 1 hour.
8.I used my iron with no water in it.I preheated it for 5 mins. on highest setting.I used my kitchen counter(stainless steel) with a large,white plastic cutting board covered in a pillow case as my base.I ironed the case.
9.Center the area of the shirt you will transfer to on the cutting board.Be sure it is straight!!I stood on a step stool to be the right height above it-you should too!Iron the shirt.
10.IMPORTANT-check shirt for lint!Remove all small threads,hairs,odd fibers!I thought I was thorough but had one small blue piece of lint stuck under a clear area!!
11.For light transfer-do not try and remove backing!(trust me,you can't!!!
) For dark transfer,peel off backing before ironing-then cover COMPLETE design with tissue paper that comes with transfers.12.Place design on shirt where you want it-try to use bottom of letters for a straight line.(you can trim a design if there is a lot of blank transfer.Don't trim too close to the design.Be careful when you are handling the transfer not to rub to much on the printed design or to scratch it with the scissors or your nails.)
13.Run iron over entire design SLOWLY and not pushing too hard for the first pass.This will help it to stick to the shirt a bit so you can then give it some elbow grease.I used too much force at first and had a mangled straight edge on one when it shifted
14.Then,lean into it and iron entire design slowly and firmly.Take about 2-3 minutes to iron it.I leaned onto the iron but not insanely hard.Run very slowing all along outer edges a few times-this is where you need it to be sealed the most!.
15.Let shirt cool for 5 minutes somewhere off the ironed area-since it is warmer there,it will take longer.Shirts can be moved without any damage.
16.Peel off paper from design slowly.
17.BE AMAZED AT YOURSELF!!!
PICS OF ALL STEPS ARE NOW POSTED!!!THEY START ON PAGE 6 IN POST #77
Hope this helps my fellow newbies! I did not wash mine after printing-we just packed them and wore them.I cannot wait to show off my family in our great designs in 3 weeks!I will be posting our pics when we return.Special thanks to Kellybell and Tebi73!


")